The GD module on CPAN is an interface to the GD Graphics Library. The Perl module was created and is still maintained by Lincoln D. Stein.
GD::Simple is wrapper around the GD module that provides a simpler interface to create drawings. The following examples are based on the example that comes with the module.
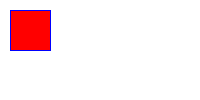
Red square (new, bgcolor, fgcolor, rectangle, png)
use strict;
use warnings;
use GD::Simple;

# create a new image (width, height)
my $img = GD::Simple->new(200, 100);

# draw a red rectangle with blue borders
$img->bgcolor('red');
$img->fgcolor('blue');
$img->rectangle(10, 10, 50, 50); # (top_left_x, top_left_y, bottom_right_x, bottom_right_y)
                                 # ($x1, $y1, $x2, $y2)

# convert into png data
open my $out, '>', 'img.png' or die;
binmode $out;
print $out $img->png;
In these examples a border was added around the image, using CSS, to make it clear what is the size of the actual image.
my $img = GD::Simple->new(200, 100); creates the image. It accepts two parameters: (width, height).
The method of the $img object are commands to the "drawing head" or "pen". In the above case we set the
background color to red using bgcolor and the foreground color (the ink) to be blue using fgcolor.
The rectangle method will draw a rectangle using the foreground color and filled with the background color.
The 4 parameters the rectangle method receives are
(top left x, top left y, bottom right x, bottom right y) where the the (0,0)
coordinates are in the top left corner. The next example shows this in a clearer way.
The last 3 lines in the above example convert the internal representation to PNG format and save it in the file called img.png.
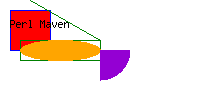
Empty Green Rectangular
Extend the above example by adding the following code (before saving the image):
# draw an empty rectangle with green borders
$img->bgcolor(undef);
$img->fgcolor('green');
$img->rectangle(20, 40, 100, 60);
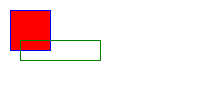
In this example the background color is transparent, so the part that covers the red square show the red square
and the part outside of the red square has white background. The coordinates provided to the
rectangle method also show much clearer where do the values belong.
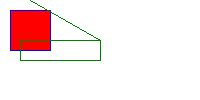
Drawing a straight green line (moveTo, lineTo)
In the next part of the example we will draw a straight line. For this we can use the lineTo method that will draw
a line from the current position of the "pen" to the given coordinates (x, y) measure from the top left corner of the image.
To position the "pen" to a specific place we use the moveTo method providing the (x, y) coordinates.
# move to (30, 0) and draw a green line to (100, 40)
$img->moveTo(30, 0);   # (x, y)
$img->lineTo(100, 40); # (x, y)
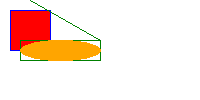
Draw a solid orange ellipse
In the next step we'll draw an ellipse in the rectangular we drew earlier. For this first we need to position the "pen" in the center of the rectangular which is also going to be the center of the ellipse. The rectangular above has the following coordinates: (20, 40, 100, 60).
The horizontal center is at (left_x + right_x)/2 = (20+100)/2 = 60.
The vertical center is at (top_y + bottom_y)/2 = (40+60)/2 = 50.
The first thing we do is use moveTo(60, 50) to move the "pen".
The total width of the ellipse is (right_x - left_x) = 100-20 = 80.
The total height of the ellipse is (bottom_y - top_y) = 60 - 40 = 20.
So we draw the ellipse after setting the colors using
ellipse(80, 20).
# draw a solid orange ellipse
$img->moveTo(60, 50);    # (x, y)
$img->bgcolor('orange');
$img->fgcolor('orange');
$img->ellipse(80, 20);   # (width height)
Draw arc
An arc is a partial circle or in the more general case a partial ellipse.
In order to draw one we have to set the "pen" to the starting point of the arc, which is its center, and
provide the following parameters: ($width, $height, $start, $end, $style).
If the width and the height are the same then this is part of a circle.
$start and $end are degrees from 0 to 360. Zero is at the right hand side of the ellipse
and the degrees grow clock-wise. Hence 0, 90 as given in the example will be the bottom Right quarter.
# draw an arc filled with dark violet
$img->moveTo(100, 50);
$img->bgcolor('darkviolet');
$img->fgcolor('darkviolet');
$img->arc(60, 60, 0, 90, gdEdged);

Draw text
The method string can put a string on the image.
# draw a string at (10,30) using the default built-in font
$img->bgcolor('black');
$img->fgcolor('black');
$img->moveTo(10, 30);
$img->string('Perl Maven');
There is of course a lot more you can do with GD and even GD::Simple, but this can get you started.
